
This leftover Ham Bone Soup is our family’s favorite, loaded with vegetables and beans in the most flavorful broth. It’s hearty and healthy, and easy to make in the slow cooker or on the stove.
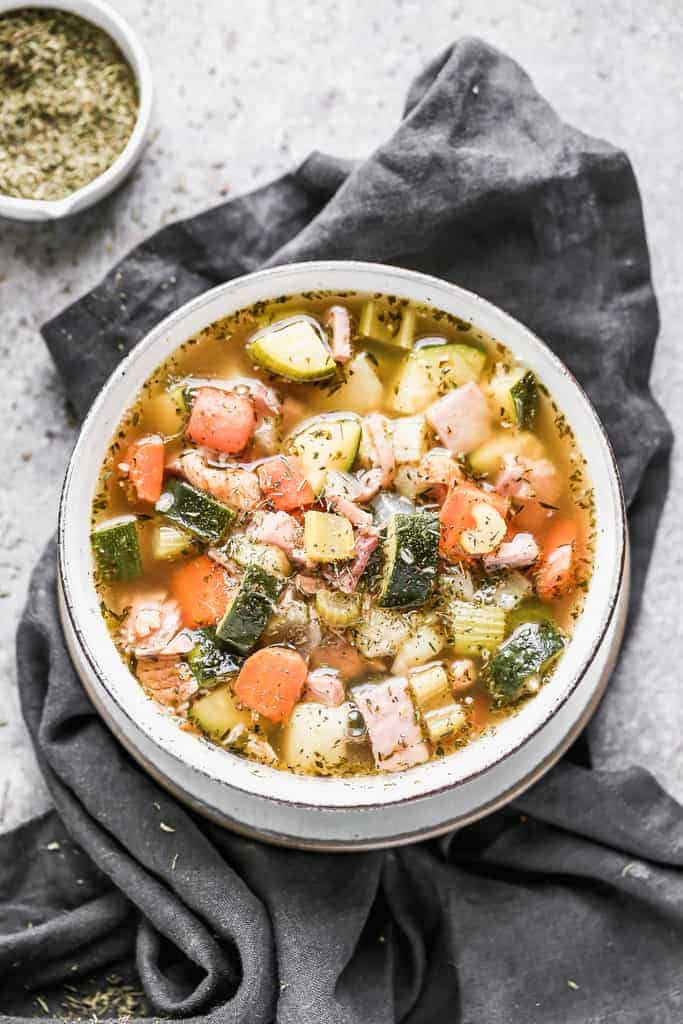
There’s no doubt this Ham Bone Soup tops my favorite comforting, hearty, healthy soup recipe. It’s my go-to for using up our leftover Easter or Christmas ham. Sometimes I’ll even go to Honey-Baked Ham just to buy one of their leftover ham bones so I can make this soup. Did you know they sell those? They are fairly inexpensive and still have quite a bit of meat left on them.
How to Make Ham Bone Soup:
Slow Cooker Method (Recommended):
- Place the ham bone, water, peppercorns, bay leaves and garlic in slow cooker. Cook on LOW for 7 hours (or overnight) or HIGH for 3.5 hours.

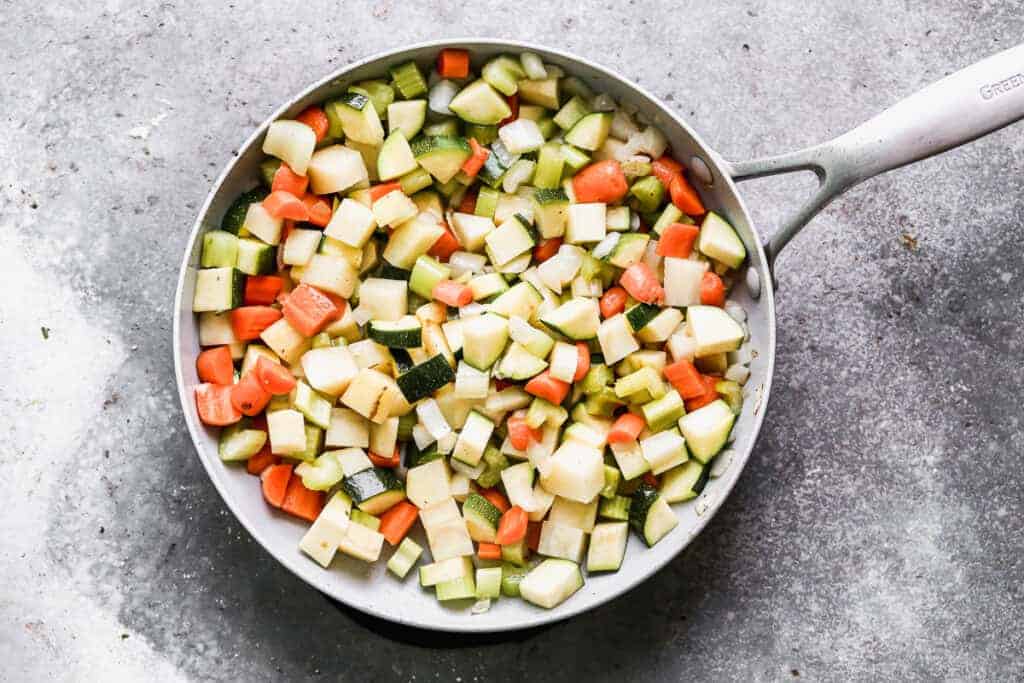
- Cook bacon in a large skillet over medium heat. Remove to plate. Remove some of the grease from the pad, reserving just a little in the pan.

- Add the chopped onion, celery, zucchini, carrots, and potato to the pan and saute for a few minutes.
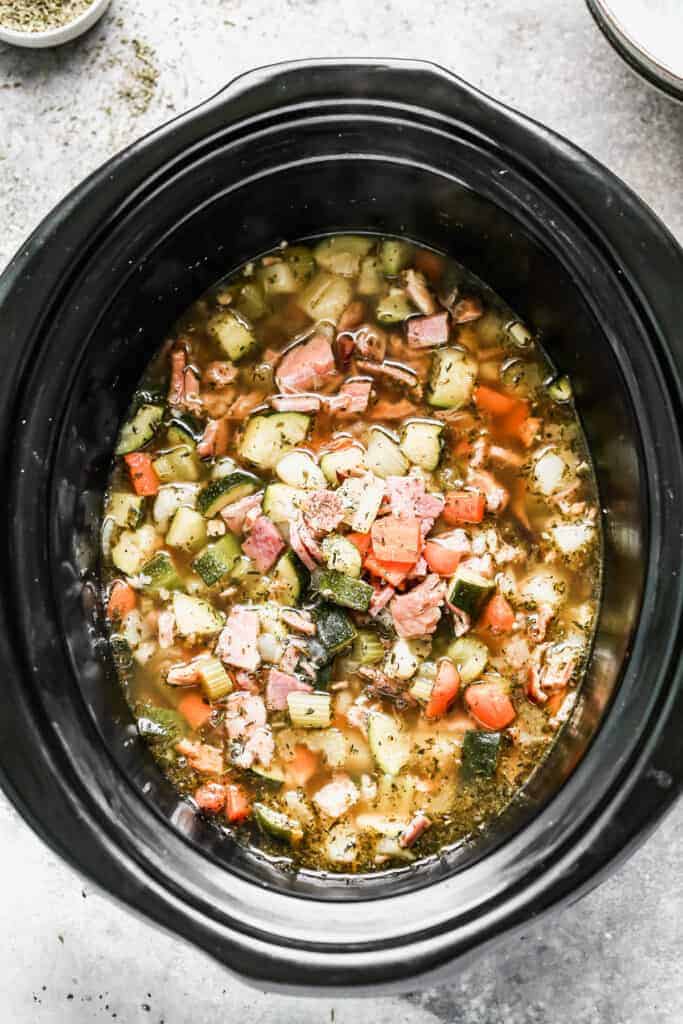
- Remove the ham bone from the slow cooker. Remove any meat from it. Add the chopped ham (and any pulled from the bone), sautéed veggies, cooked bacon, and the remaining ingredients to the broth in the slow cooker. Taste and add a little more of the spices, if needed. Cook on LOW for 2 more hours.
Stovetop Method:
- Place the ham bone, water, peppercorns, bay leaves and garlic in a heavy stock pot. Bring to a boil, cover, reduce heat to low, and simmer for 2 hours.
- Cook bacon in a large skillet over medium heat. Remove to plate. Remove some of the grease from the pad, reserving just a little in the pan.
- Add the chopped onion, celery, zucchini, carrots, and potato to the pan and saute for a few minutes.
- Remove the ham bone from the pot and remove any meat from it. Add the chopped ham (and any pulled from the bone), sautéed veggies, cooked bacon, and the remaining ingredients to the pot. Taste and add a little more of the spices, if needed. Cook until potatoes are tender.
Make Ahead and Freezing Instructions:
To Make Ahead: The ham bone broth can be made ahead and stored in the fridge for for a few days or frozen for up to 3 months. Chop the veggies ahead of time and store them in in the fridge until ready to assemble the soup.
To Freeze: The leftover ham bone and ham meat can be frozen for several months. The assembled soup can also be frozen, once cooled, for up to 3 months, stored in a freezer-safe container. Thaw overnight in the refrigerator and rewarm on the stove or in the slow cooker on low heat.
More Popular Soup Recipes:
- Spicy Chicken Soup
- Chicken Noodle Soup
- Taco Soup
- Roasted Tomato Basil Soup
- French Onion Soup
- Chile Verde Soup
FOLLOW ME on FACEBOOK, TWITTER, INSTAGRAM and PINTEREST for more great recipes!
Recipe

Ham Bone Soup
Equipment
Ingredients
Broth:
- 1 leftover ham bone
- 7 cups water
- 20 whole peppercorns
- 2 bay leaves
- 4 cloves garlic , minced
Soup:
- 5-6 slices bacon
- 1 small onion , diced
- 2 ribs celery , chopped
- 1 medium zucchini , chopped
- 2 carrots , peeled and diced
- 1 russet potato , peeled and diced
- 2 cans great northern beans , rinsed and drained
- 1-2 cloves garlic , minced
- 1/4 teaspoon Dried oregano
- 1/2 teaspoon dried thyme
- 1 Tablespoon dried parsley flakes
- salt and freshly ground black pepper , to taste
- 1 1/2 cups leftover diced ham
Instructions
Slow Cooker Method (recommended):
- Place the ham bone, water, peppercorns, bay leaves and garlic in slow cooker. Cook on LOW for 7 hours (or overnight) or HIGH for 3.5 hours.

- Cook bacon in a large skillet over medium heat. Remove to plate. Remove some of the grease from the pad, reserving just a little in the pan.
- Add the chopped onion, celery, zucchini, carrots, and potato to the pan and saute for a few minutes.
- Remove the ham bone from the slow cooker. Remove any meat from it. Add the chopped ham (and any pulled from the bone), sautéed veggies, cooked bacon, and the remaining ingredients to the broth in the slow cooker. Taste and add a little more of the spices, if needed. Cook on LOW for 2 more hours.


Stove Top Method:
- Place the ham bone, water, peppercorns, bay leaves and garlic in a heavy stock pot. Bring to a boil, cover, reduce heat to low, and simmer for 2 hours.
- Cook bacon in a large skillet over medium heat. Remove to plate. Remove some of the grease from the pad, reserving just a little in the pan.
- Add the chopped onion, celery, zucchini, carrots, and potato to the pan and saute for a few minutes.
- Remove the ham bone from the pot and remove any meat from it. Add the chopped ham (and any pulled from the bone), sautéed veggies, cooked bacon, and the remaining ingredients to the pot. Taste and add a little more of the spices, if needed. Cook until potatoes are tender.
Notes
Nutrition
Create a FREE Account to save your favorite recipes and create meal plans
Have you tried this recipe?!
RATE and COMMENT below! I would love to hear your experience.
I originally shared this recipe February 2018. Updated April 2021 with new photos, a video and improved instructions.
This post contains affiliate links.


This is the first time I’ve tried making stock from any phone. But I thought I would give it a try with my Christmas hand bone and leftover ham. To my surprise, my family loved it.
I have written a review already stating how fabulous this recipe is and that it is better if the broth is cooked overnight or all day in the slow cooker. My slow cooker was broken, I already new that stove top all the way is still good, but lacks the flavor produced by longer slow cooking. Here are my notes for what I tried in my instant pot in case anyone else wants to try: I cooked the broth on high for 2 hours and did an instant release. Good broth, but not nearly the power punch of the all day crock pot Next time, make the broth a day ahead, let it cook max hours in insta and let the insta release on its own. I sautéed the veg and added everything to the instant except for the canned beans, which I was afraid would overcook. Cooked for 2 minutes on high. This was probably a little too long because the potatoes and zucchini were a little mushier than I would have liked.
NEXT TIME, make the broth a day ahead, let it cook max hours in insta and let the insta pressure release on its own. Try pressure cooking all other ingredients except beans for 1 minute, or finish veggies on stove top. Also experiment with not sautéing the veggies before pressure cooking them.