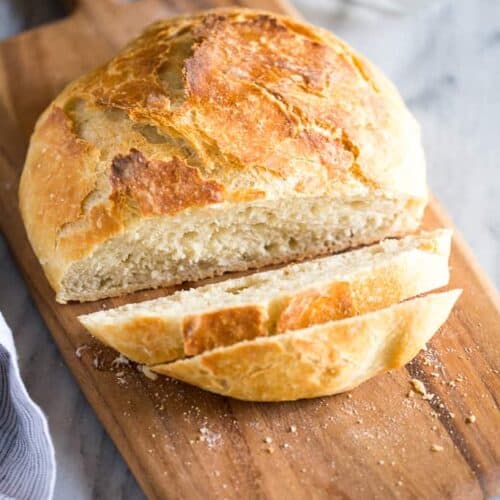
This quick and easy No Knead Bread has a crisp artisan crust and is extra soft and tender inside. It only requires four ingredients and couldn’t be easier to make.
Nothing beats the smell of homemade bread! It will amaze you how quick and easy it is to make this No Knead Bread and you can make the bread dough without any special tools!! My other favorite bread recipes include Honey Whole Wheat Bread and Easy Banana Bread.
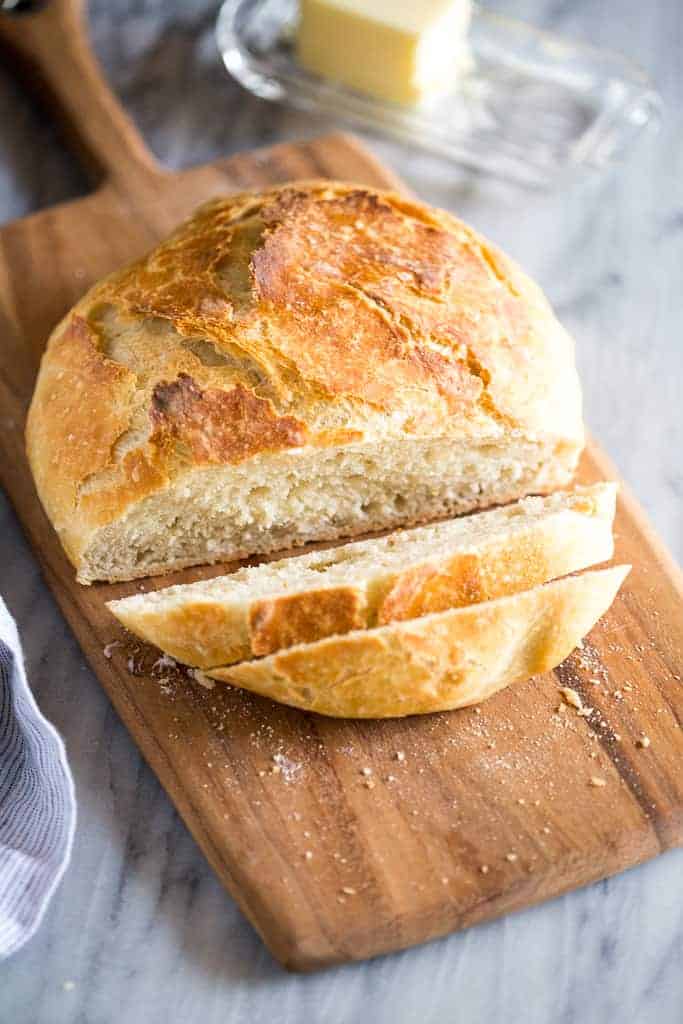
I have included some variations for making this No Knead Bread. You can make the bread dough even healthier by using whole wheat flour (see directions below) or add a variety of different flavors to the dough. You can also choose to bake it on a baking sheet or in a cast iron pan!
It’s hard to believe there is absolutely no kneading required to make this bread, but you have to try it! I’m confidant you’ll “wowed” by how easy this bread is to make!
How to make No Knead Bread:
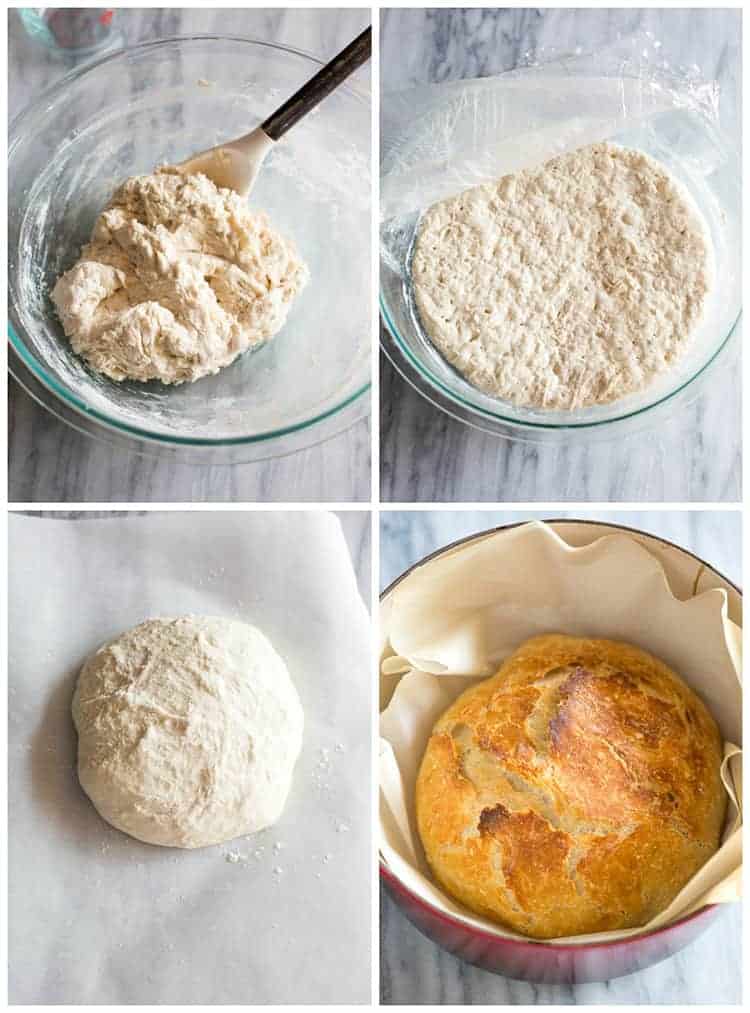
- In a large mixing bowl, combine flour, salt and yeast. Pour in warm water and stir with a wooden spoon until well combined. The dough will be sticky. Cover the bowl and allow it to rise at room temperature for 3-4 hours, or in the refrigerator for up to 15 hours.
- Scoop dough onto a floured work surface and shape into a ball. Sprinkle a tiny bit of flour on top of the dough ball and place it on a piece of parchment paper. Cover the dough lightly with plastic wrap. Allow to rise for 30 minutes.
- Meanwhile, place an empty cast iron pot, with the lid on, into the oven and preheat oven to 450 degrees F.
- Remove covering from dough ball. Lift the parchment paper and dough ball up, and place inside cast iron pot that’s been preheating in the oven. Cover with lid and return to oven to bake for 30 minutes.
- After 30 minutes, remove lid and bake, uncovered for 12-15 more minutes, until golden on top. Remove from oven and allow bread to cool on a wire cooling rack.
- Store bread in an open paper bag on the counter for up to 1 week.
- Baked (and cooled) loaves of bread can be frozen for up to 3 months.
No Cast Iron Pan? Use a Baking Sheet!
- Make the dough as directed, including allowing it to rise. Place it on a greased baking sheet.
- Add three cups boiling water to a 9×13 pan and set it on the lowest rack of your oven. The water will create steam which will help keep the bread crusty on the outside as it bakes. Bake for about 30-35 minutes.
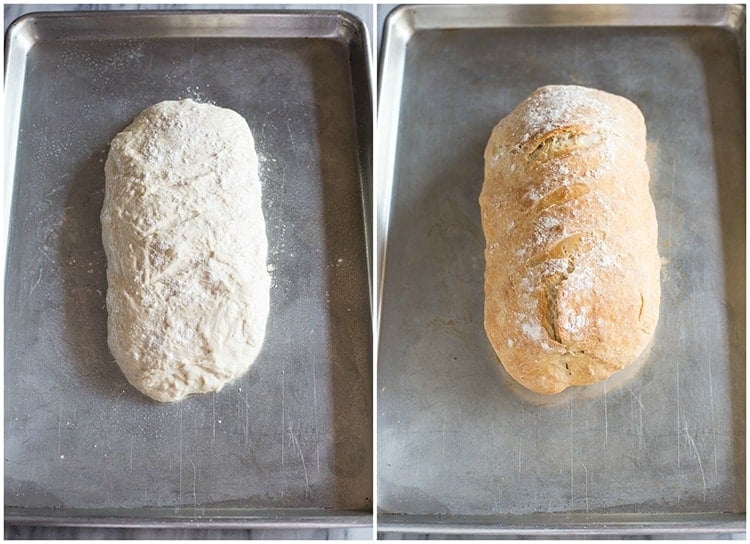
The result is the same delicious, crusty bread, and I love that you can really shape the dough any way you like when you use this method. I shaped mine into a log and I cut 3 very shallow diagonal slits in the top (optional). I felt like I was eating my own homemade version of a La Brea baguette!
Variations:
- Whole Wheat Flour: For best results, use half whole wheat flour and half white flour. Try stirring in 2 tablespoons of honey to the warm water, for a flavor boost. Make and bake as directed.
- Mix-Ins (add to the flour mixture, before adding water):
- 3 large cloves minced garlic plus 2 Tablespoons fresh chopped rosemary,
- 1 cup favorite kind of shredded cheese (try adding a chopped jalapeño!)
- ¾ cup dried cranberries and/or chopped nuts.
Freezing Instructions:
Make the dough and place in a freezer-safe bag. Freeze for up to 3 months. Thaw completely in the refrigerator, then allow to rise for 30-45 minutes at room temperature before baking. Baked (and cooled) loaves of bread can also be frozen for up to 3 months.
Follow me for more great recipes
Recipe
No Knead Bread
Ingredients
- 3 cups all-purpose flour
- 2 teaspoons coarse sea salt
- 1/2 teaspoon active dry yeast (or instant yeast)
- 1 ½ cups warm water (about 110 degrees F)
Instructions
- In a large mixing bowl, combine flour, salt and yeast. Pour in warm water and stir with a wooden spoon until well combined. The dough will be sticky. Cover the bowl and allow it to rise at room temperature for 3-4 hours, or in the refrigerator for up to 15 hours.
- Scoop dough onto a floured work surface and shape into a ball. Sprinkle a tiny bit of flour on top of the dough ball and place it on a piece of parchment paper. Cover the dough lightly with plastic wrap. Allow to rise for 30 minutes.
- Meanwhile, place an empty dutch oven/cast iron pot*, with the lid on, into the oven and preheat oven to 450 degrees F.
- Remove covering from dough ball. Lift the parchment paper and dough ball up, and place inside cast iron pot that’s been preheating in the oven. Cover with lid and return to oven to bake for 30 minutes.
- After 30 minutes, remove lid and bake, uncovered for 12-15 more minutes, until golden on top. Remove from oven and allow bread to cool on a wire cooling rack.
- Store bread in an open paper bag on the counter for up to 1 week.
Notes
- 3 large cloves minced garlic plus 2 Tablespoons fresh chopped rosemary,
- 1 cup favorite kind of shredded cheese (try adding a chopped jalapeño!)
- ¾ cup dried cranberries and/or chopped nuts.
Nutrition
Did You Make This Recipe?
Tag @TastesBetterFromScratch on Instagram with #TastesBetterFromScratch!
This post contains affiliate links.




I found this recipe easy to follow and I even got adventurous and added jalapenos and cheese to the dough. It turned out fantastic my daughter’s loved it and I will continue to make bread this way
because my youngest has soy allergies and can’t eat purchased bread from the store. Thank you for sharing this fabulous recipe
I inadvertently used course kosher salt instead of course sea salt! Will my loaf taste okay, or will it be too salty?
Amazing recipe! Turns out perfectly every time, I will never buy bread again!!
I’d love to bake this Artisan bread
So easy and delicious!! My family loves this bread!
What size Dutch oven? I have a 3 quart is that large enough?
Thank you for the recipe.
My family & I are fed up with store brand bread, so I looked up easy to make bread to find this gem🍞💎!
My 11 year old son ate 1/3 of the loaf that night making different things! To hear; mom this is the best bread ever (even from a kid) did it for me!
I make a loaf every other day now!
Thank you for sharing!
Recipe tasted great and was super easy! My only issue is that on the 2nd rise my dough just spread out vs going upward. Once I put it in the oven it just stayed the same size/shape so I ended up with bread that was rather flat and had a tight texture. Any ideas on where I may have gone wrong?
This is my 3rd time making this bread and I absolutely love it! The same exact thing happens to me every time!
It’s delicious and easy, but it can’t be shaped. The only thing I can think is reducing the amount of water a bit. Next time I’ll try 1 cup instead of 1.5 cup of water.
Love this recipe! Made it several times last year for guests and for my family for dinner. It’s definitely a favorite!
As soon as the fall season began my husband requested, ‘The Taste Better From Scratch Bread’.
It truly never disappoints.
I was skeptical at first because I thought 3-4 hrs for the dough to rise??🙄 But oooh man this bread was absolutely amazing. I’m so happy I tried it. Thank you
Thank you for your recipes you’re artisan bread the whole wheat does it use the same amount of water I was told to put extra water if you’re using whole wheat flour could you please advise thank you
can i use rye flour?
I have never made bread in my life and decided to try this recipe and am so thankful I did!! I added 2 jalepenos and 1 cup cheddar cheese like she suggested in the notes. Yes, it takes a long time for the rising of the dough but I can tell you the end product was absolutely AMAZING! Nice and crusty on the outside and super moist on the inside. I plan on using this recipe many more times. Thank you for sharing!!
Can the dry ingredients be mixed and stored in a Mason jar for later use???
If so
About how long do you think it would keep on a shelf???
Just a hint for other’s with the “tough bottom crust” issue: I use a vintage cast iron dutch oven in a propane fueled oven. The 1st time I ate this bread I think I burned more calories chewing than I consumed. A possible solution is to put a cookie sheet on the lower rack of the oven to keep the direct heat away from the bottom of the dutch oven. Works great for me.
I have an issue with this recipe’s ingredients. I don’t see how 1/2 tsp of yeast would ever make this bread rise. I used 2 tsp and it worked fine. But even with 2 tsp it took a LONG time to rise. I’ve tried other No-Knead recipes and all are almost identical in ingredient amounts and procedure – with the exception of the yeast.
That’s what I’m thinking. It sure isn’t rising like I’d like. Fingers crossed it turns out
This recipe was no for me. The dough did not rise fully and the bread was undercooked inside, almost burnt on the bottom. Waste of time!
Love this recipe! I make it most weekends for us to enjoy and it’s a hit. I love serving with soup or stew
I made this recipe with Bob Mills gluten free flour, I think it would have worked if I hadn’t put too much water in the dough!! Will try again. Do you have any tips for a gluten free version?
This recipe is everything! I’ve wanted to make from scratch bread but have been intimidated. This recipe & your instructions couldn’t be any easier. I followed it exactly and made a most perfect bread. I’ve already raved to everyone about it and can’t wait to make it again. Many thanks!
Are you sure the 1/2 tsp of yeast is correct? It dosen’t seem like much and mine didn’t rise hardly at all.
I use 1 full tsp of granulated yeast and it’s just right for me. Yeast is tricky in that every kind seems to have a different strength. It also loses some of its punch as it ages, and you have no way of knowing how long it sat on the shelf before you bought it. It’s trial and error.
Hi Lauren, I’m anxious to make this today. I didn’t see the note on the sea salt.
Can I use regular salt? Thank you.
It was a cool, humid, rainy day so I thought I would try and make this bread… It turned out awesome and I will make this again.. May try some variations next time… Loved It……
I made this tonight and it is very good. This is the first time I have made french bread but I will be making more and will freeze some for later. Thank you for the recipe.
This bread is so easy! Anyone can do it! Delicious!
Love this recipe, it is so versatile, I do make sour dough bread with the starter..but just love to try different bread recipes….Thanks for the wonderful recipe!
Hi Lauren,
I cant wait to make this today. Can I use bread flour? Thanks so much,
Melissa
My bread didn’t rise much the second time. I baked it after letting it rise for 30 minutes. Should I have let it rise longer?
tryng it with 2 tbsp honey granuels and 3 tbsp dry milk powder…will let you know of the resuts.
What baking rack level should this be baked on? Metal rack lower rack? Thank you.
What rack level should this bake on? Middle?! Lower?? Thank you
Any advice on how to keep my dough from flattening?? I followed the instructions to the letter and Nido would not form into a ball. It was a bit dome shaped, but definitely not a ball.
I ended up adding another cup of flour it was too sticky!
Love the recipe, but both times I’ve made it, the bottom crust has been oddly thick. Not sure if I am stirring/playing with too much before setting it out to rise? Can it be made tough by excessive working of the dough?
Thanks for the great recipe!
Tasted great! I let is rise for almost 8hrs, the middle of the bread was a little under baked. Any suggestions? I also baked for the amount of time you recommended. Thanks!
I made this recipe last week and it was gone in an hour.
Everyone loved it. I’m making another one tomorrow
thank you for such an easy recipe. Oh I did add 1 tablespoon of sugar
and 4 tablespoons of butter to my bread and it was delicious.
This recipe is amazing, thank you! I’d like to make a smaller portion, can the recipe be halved & if so, how does the cooking time change please?
I made this bread once and it tasted very yummy, but, for that many hours of rising it dried out on the surface before I could bake it. I wrapped it in plastic but it still dried out. I am giving it out another go and would appreciate a suggestion. I have sprayed it lightly with water but it appears to want to crust over. Thanks.
Place the dough in an airtight container with a lid.
I’ve made this in my Dutch oven & it’s awesome!! Wish I could attach a pic because I also used a banneton and it’s so pretty! Any suggestions on preventing the bottom of the bread from getting hard during the baking process?
Does removing the lid towards the end mostly just bake the top of the bread? I cut down the baking time to avoid a darker top but wanted to make sure it didn’t affect the inside of the bread. I gifted that bread so no idea what it looks like inside. Thx so much, you rock!!
I’ve made this twice now. First time I made the basic recipe. Last night i used half spelt and half white flour and added a little honey. Just sliced and sampled it. This will be my go to artisan bread recipe from now on. Thank you so much for this easy and wonderful recipe!
This was the easiest recipe I’ve ever made! I followed a link from your white bread recipe and figured a hands-off recipe would be nice for a change! My whole family loved this- I will definitely make it again!
Made this recipe for my husband and his friends for a weekend at their camp to have with chili. They absolutely loved it. I added about a tsp of Italian seasoning to one loaf and one loaf plain. They all wanted the recipe. Th thanks for sharing this.
I tried this recipe and mine was really runny so I added more flour…then even though it rose after proofing it was really flat and didn’t stay together like doughs I’ve made previously. Should I have used a specific dough..still kind of new to this so any help would be greatly appreciated. Was really delicious just didn’t look like yours did. Thanks
Excited to say my antique cast iron pot with makeshift lid of a triple layer of tinfoil anchored with a Pyrex pie plate worked perfectly for this super attractive looking bread! Thanks for the simple and delicious recipe!
Do I have to change anything in the recipe for high altitude? 🙂
Hello if I was to use instant yeast does anything need to change in the recipe? Does the rise time reduce?
Nothing really changes, but you could let it rise for only 4-6 hours if you want.
I saw this recipe and just had to try it. It is Awesome!! The first time I made it I only let it rise 5 hrs due to time constraints but it was still delicious. So good in fact that my family asked me to make it again the next day as the first loaf only took a few hours to disappear. The next day I let it rise for 7.5 hrs and it was a bit bigger loaf. Next time I make it I will leave it overnight.
I have never had much success with bread making but with this recipe its so easy to bake a great looking, awesome tasting, company worthy loaf!
awesome recipe! easy to follow and great bread. Will make again!
What size Dutch oven do you use?
Any size 4 quart of bigger will work fine! Mine is a 6qt.
I haven’t tasted it yet. Just took it out of the oven. Was very skeptical because the recipe is ridiculously easy and there are so few ingredients. I do not own a dutch oven, so I baked it in a casserole dish with a cover. My house smells amazing and it is photo worthy bread!! I really messed up an attempt at challah a few weeks ago because I halved the recipe and got distracted and added the full amount of water. I followed this one to the letter.
Thank you!!
Delicious and easy to make. I have baked it in the ceramic pot and also on the sheet pan with a pan of water under. The ceramic pot makes a round bread great for company dinner. The sheet pan method allows you to form a loaf that makes great sandwiches and is a great fit for the toaster. I made a loaf with Asiago cheese and rosemary. Slightly toasted with butter and I am a happy woman. I now make a double recipe for two loaves at a time. Thanks so much for this wonderful recipe!
Made this today with the sheet pan method. It was f***ing epic! So easy and turned out perfect! Thank you
I made this last night and baked today. Turned out well but very bland. I will make again with added spices and know I’ll love it. Texture was great.
Love this bread, however I’ve made it twice and it’s so hard to cut, especially through the bottom, I almost have to rip it. What am I doing wrong ?
Also if I want to add jalapeños and cheese, how much and when would you suggest?
Here’s a big trick for cutting the bread; Cut the entire loaf in half, then take one half and place the inside/bready side face down, (crust side up). It makes it much easier to cut into slices without squeezing on the bread too much. Also make sure you’re using a sharp bread knife!
Loved this bread. But my bottom crust got too browned and was tough. Any suggestion would be great.
Excelente thank you very much
Had a little trouble shaping into a ball. Dough was very sticky. Did I do something wrong? Other than that, came out nice. Good crust and tasty
This recipe was so easy! It was my attempt to make bread and the aroma was amazing! I will be using this recipe again.
After rising, my dough is so sticky and soft that I can’t shape it into a ball. What am I doing wrong?
Hi Lynda, you could add a little more flour, or flour your hands really well to help it to come together.
Thanks you. I will do that. Love the bread.
Lynda
Followed the recipe exactly in a cast iron pot and it came out looking just like the picture! Delicious! Can’t wait to experiment with some of the add-ins you have suggested. Anxious to try the baking sheet suggestion to see how it compares to the cast iron pot! Thank you for this recipe. I will be sharing it!
Do you leave the bread in the Dutch oven when cooling or remove it to the rack by itself
I remove it to a rack to cool.
What is the best way to store this bread so it doesn’t get mushy?
In a brown paper bag, with the end open.
I decided today to make your bread recipe. It looks easy. So I am using whole grain whole wheat flour. Should be ok to used this type of flour? Thank you
It will be pretty dense if made with all whole wheat flour. I’d suggest at least using 1/2 white flour.
I love this bread! shared it with my sister in law and they love it too! could I use it to make pizza crust?
Just made my first ever loaf. So easy. So delicious! Try it. You’ll love it.
This bread is incredible! I’ve made about four loaves now – and loving it every time. Shared with friends – and they’re fans too! My husband is making delicious sourdough from scratch – that takes days and tastes great – but I have to say, this is a tough competitor. I’m going to start to experiment with apricots/raisins etc…
I just wanted to say that I love this recipe! It worked so well and was so easy to do. Literally threw the ingredients into a large bowl, used a spatula to mix together and covered for around 8 hours. So good looking and I am sure it tastes as good as it looks, waiting for it to cool a few minutes before cutting it… Thank you!
I had a question. How imperative it’s it to let it sit for the minimum 6 hours? My patience is wearing thin and it’s thick and bubbly and doubled in size and I still have 3 hours to go
It’s not imperative. I would wait at least 3.
Just made my first batch it’s amazing! Any suggestions on how to add roasted garlic cloves after the first rise?
After the first rise mix the garlic in when forming the bread into a loaf on the counter. Enjoy!
Easy easy easy and oh so good.i added sunflower seeds. The bread was gone in no time. Will definately make this one again and very soon.
Thank you for such an excellent recipe that a total beginner like myself can succeed in making healthy and delicious bread for our family!
I have one question. The active dry yeast I am using (Fleischmann’s) requires 1/4 cup of water to activate.
Should that amount be added to the 1 1/2 cups warm water (for a total of 1 3/4 cups)?
If you know the yeast is fresh you don’t need to activate it. Just add it as stated in recipe.
So easy to make! First time my husband and I made bread! The crust is my favourite part!! So crusty!!
Have you doubled the recipe with good results?
I have never tried doubling it, but I’m sure it would work great.
At what point can i add dry herbs or fresh garlic?
Mix them in after the first rising.
If using a cookie sheet
Do you still bake it at 450?
Yes, bake at the same temperature!
Ok so I must be a fool cuz I still messed it up. Ended up not rising well and was dense. What did I do wrong??
I would check your yeast.
Made it yesterday. We already ate the whole loaf. I have another one rising now. It was ridiculously easy to make and so delicious. I used a tad less salt for the second loaf. We’ll see how it turns out.
Can I use whole-wheat flour instead? Will it work well?
It would be really dense–I’d suggest at least 1/2 and 1/2 white. Enjoy!
This bread is awesome! I’ve made it three times now but the last two times the bread dough has split….. almost like it is peeling off a top layer. Am I doing something wrong? I took a picture but can’t upload it here.
Nothing wrong. Next time you could gently score the top of the loaf with an “x” before cooking it.
Will instant yeast work with this recipe?
Yes. Enjoy!
I am looking forward to making this recipe. What size cast iron pot is best?
Any will work!
Easy and everyone loved it. I had no parchment paper, but sprayed Pam in the bottom of my pot and it was good. Thank u!
If I wanted to add herbs or spices, when would I do that?
In with dough at the beginning.
First time making bread ever! Turned out perfect! Everyone gobbled it right up! Making 2 batches again today!
Have made this several times. Is our families go-to bread. Everyone loves it.
Awesome recipe, thank you. Simple prep, delicious eating!
Can you use bread flour or self-rising flour?
Bread flour is fine.
Bread was very easy to make. Taste great!!! I made one loaf than two days later slider rolls! Again easy and yummy! Thank you for this recipe!
WOW. This worked amazingly well – my family demolished it in seconds! Two questions: Can the recipe be doubled for a larger loaf, and what size dutch oven did you use? Thanks so much for this!
Hi – This recepie is so easy and taste delicious.
Question: If I want to add Cranberries and walnut when should I had them?
At the beginning, but if you’re worried about the nuts getting soft you could add them after the first rise just very gently mix them in one time (don’t over handle the dough).
This looks easy & fun, and has the added benefit of not being high in calories. I’ve printed it off & plan to make some soon. Why Not? We can’t watch TV all the time while sheltering in place.
How could I make this bread with almond flour? Would it come out the same way using the same instructions?
I can’t say, I haven’t tested with almond flour! Sorry!
This recipe was AMAZING! I can’t wait to make more and try some different variations like adding herbs and cheese. Thank you so much for sharing.
What if I don’t have any parchment paper?
Try aluminum foil sprayed with cooking spray, or just spray the pot well with cooking spray.
This recipe was so easy and took no time at all!! I love how the outside came out perfectly golden and crunchy while the inside was so soft and perfect! I will defiantly be making this again. Another great plus is I was able to put it together in the morning before work and then not thing about it all day and then when getting dinner ready throw it into the oven and it was good to go!
Would you stir in the cheese while it’s rising or wait until it’s formed into a ball? Can’t wait to try this!
I would add the cheese after the main rising, when forming it into a ball. Enjoy!
Hi, is rising time 12 to 18 hours or 2 to 18 hours?
It’s best if it rises overnight, 12 -18 hours.
Wow, this bread is amazing! It was so easy to make, and my family loved it. I will be making this regularly
I’m glad it was a winner! Thanks for commenting 🙂
Amazing recipe! Bread came out perfect! Will definitely be making again and again! Thank you!
I’m so happy to hear it! Thanks Catherine.
Excellent recipe !! Thank you so much ! Never made bread before.. this is foolproof.. I added egg wash and sprinkled everything bagel seeds from TJ’s on top. My family loved it! Making two more loaves as I write this…?
Wonderful! It really is such a simple recipe–I’m glad you enjoyed it. Thanks for commenting!
I’m amazed at this recipe. Homemade bread is a little intimidating to me but I thought I would try it anyways. WOW! I feel l like a professional baker! Thanks for a great recipe with simple instructions.
Thank you Anna! It really is such an easy and yummy recipe! I’m happy you tried it.