The BEST Cheesy Breadsticks that are easy to make and even better than take-out!
Serve them with a simple marinara sauce or homemade ranch dressing.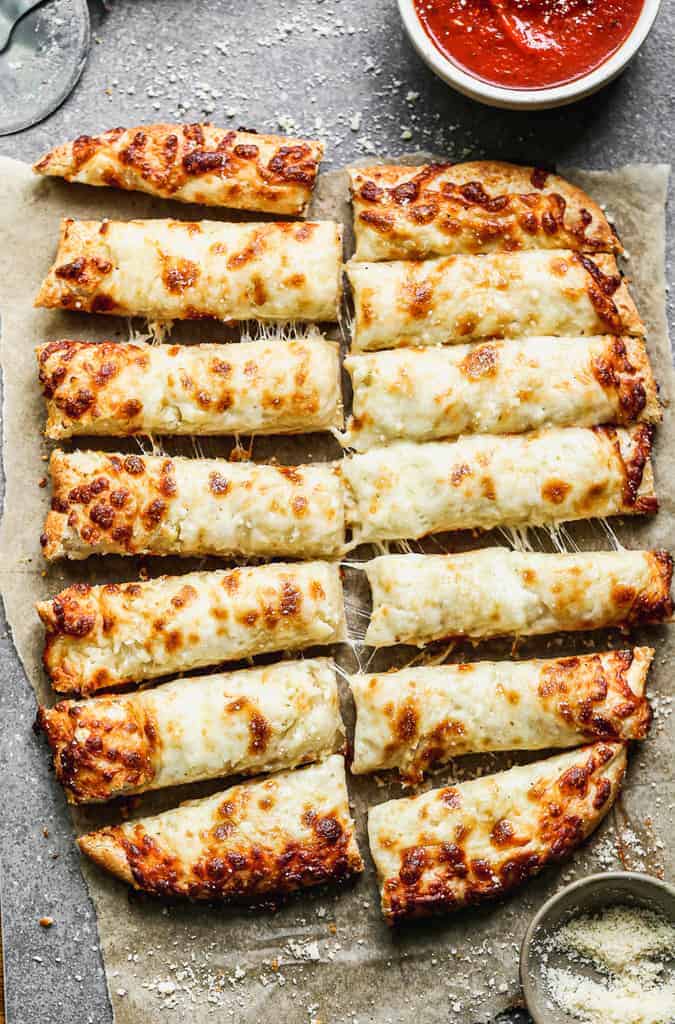
For this recipe I took my favorite homemade pizza crust recipe and halved it, to make one batch of breadsticks. You could make the full recipe for two batches of breadsticks, or use half the dough to make one pizza, and the other half to make cheesy breadsticks.
How to make Cheesy Breadsticks:
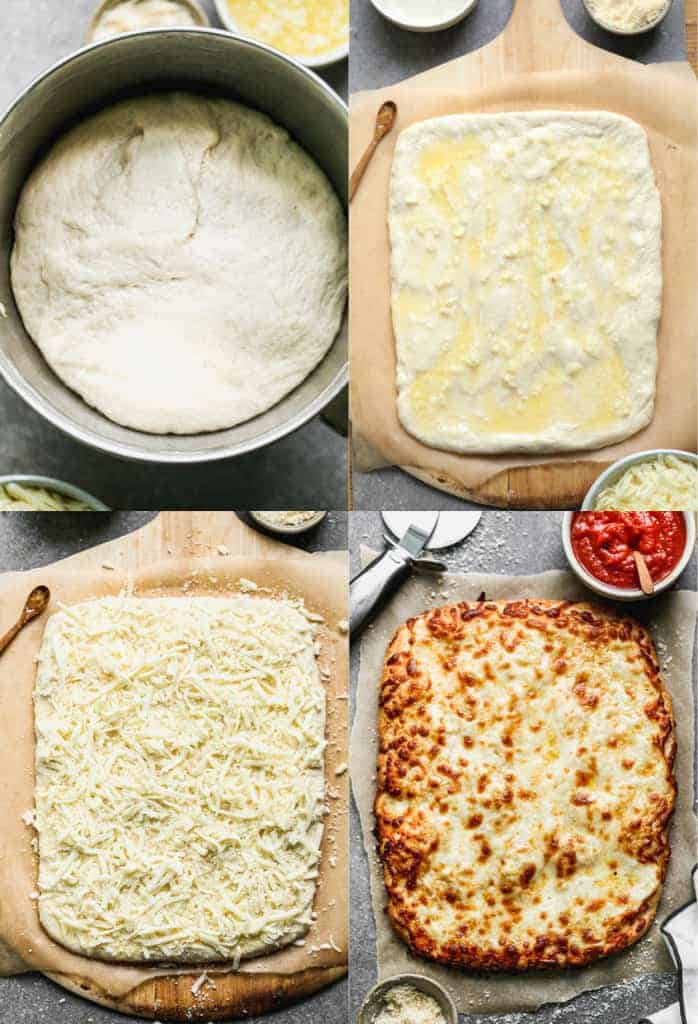
1. Make dough: Combine warm water, sugar and yeast. Let rest for 5 minutes. Add the remaining water, olive oil, salt and vinegar. Gradually add the flour and knead to a soft dough. Cover the bowl with a dry towel and allow to rest in a warm place for 1 hour.
2. Shape breadsticks: Gently punch the dough down, place it on top of a sheet of parchment paper, and use your hands (or a rolling pin, but it’s easier with your hands) to spread the dough into a rectangle about ⅓ inch thick. .
3. Add toppings: Mix melted butter and garlic in a small bowl and spread the butter and garlic mixture evenly over dough, all the way to the edges. Top with parmesan and mozzarella cheeses.
4. Bake: Transfer the dough (still on the parchment paper), gently onto the hot pizza stone or cookie sheet and bake at 500 degrees for about 8 minutes or until golden and bubbly.
Serve with dipping sauces like marina sauce or ranch.
Variations:
- Cinnamon sugar breadsticks: make the dough, form the breadsticks, then top with ½ stick of melted butter. Mix ½ cup sugar with 2 Tablespoons ground cinnamon and sprinkle over the buttered breadsticks.
- Swap the cheese: feel free to substitute any kind of shredded cheese you like.
- Make pizza: This breadstick recipe is the same as my pizza dough recipe. You can use this recipe to make 1 pizza crust or double it to make pizza and breadsticks!
Make Ahead And Freezing Instructions:
To make ahead: Make the dough 3-4 hours before you want to bake breadsticks, storing it in the refrigerator to rise (instead of at room temperature).
To freeze: Make the dough. Spray it with non-stick cooking spray and place it inside a freezer safe bag. Try to get as much air as possible out of the bag. Freeze homemade dough for 2-3 months. Allow to thaw overnight in the refrigerator. Remove to the counter for 30 minutes before forming into breadsticks.
Breadsticks go with pizza! CONSIDER TRYING THESE POPULAR PIZZA RECIPES:
- White Garlic Chicken and Veggie Pizza
- Loaded Jalepeno Popper Pizza
- Chicken Alfredo Pizza
- Pesto Veggie Pizza
- Garlic Ranch Chicken Pizza
- Barbeque Chicken Pizza
- Garlic Knots
You can also FOLLOW ME on FACEBOOK, TWITTER, INSTAGRAM and PINTEREST for more great recipes!
Recipe
Cheesy Garlic Breadsticks
Ingredients
Dough:
- 1 1/8 teaspoons active dry yeast
- 1 teaspoon granulated sugar
- 3/4 cup warm water
- 1 1/2 Tablespoons olive oil
- 3/4 teaspoon salt
- 1/2 teaspoon white vinegar
- 1 ½ - 2 cups bread flour , or all-purpose flour
Topping:
- 1 1/2 Tablespoons salted butter
- 2 cloves garlic , minced
- 1/3 cup freshly grated parmesan cheese
- 1 1/4 cups shredded mozzarella cheese
Instructions
- In a large bowl or stand mixer combine ½ cup of the warm water with the sugar and yeast. Stir to combine and let rest for 5 minutes. Add the remaining ¼ cup warm water, olive oil, salt and vinegar.
- Begin mixing on medium-low speed and gradually add the flour --knead for a few minutes, or until the dough is smooth and elastic (it should be slightly sticky, but not so sticky that it sticks to your clean fingertip). Mine is usually ready with 1 ½ cups flour) Cover the bowl with a dry towel and allow to rest in a warm place for 1 hour.
- Preheat oven to 475 degrees F with a pizza stone inside or upside down cookie sheet inside.
- Gently punch the dough down. Place a large piece of parchment paper on your counter and use your hands (or a rolling pin, but it’s easier with your hands) to spread the dough into a rectangle about ⅓ inch thick.
- Mix melted butter and garlic in a small bowl then spread mixture evenly over dough, all the way to the edges. Top with parmesan and mozzarella cheeses.
- Transfer the dough (still on the parchment paper) onto the hot pizza stone in the oven. Bake for 8-12 minutes or until golden and bubbly.
- Serve with dipping sauces like marinara sauce or ranch.
Notes
Nutrition
Did You Make This Recipe?
Tag @TastesBetterFromScratch on Instagram with #TastesBetterFromScratch!
Have you tried this recipe?!
RATE and COMMENT below! I would love to hear your experience.
I originally shared this recipe February 2017. Updated September 2020.

This post contains affiliate links.



It did not rise in the oven at all and it was super dry.
How to store after baking? Can they be room temperature for a few days? I thought of baking some and shipping to my husband who works out of town. Can’t wait to try these. Thank you
It’s great that you want to share the cheesy breadsticks! After baking, you can store them at room temperature for a day or two in an airtight container to keep them fresh. For longer storage, it’s better to freeze them. Just wrap them tightly in plastic wrap and then in foil. They can be frozen for up to a month.
When you’re ready to ship them to your husband, you might consider packing them frozen with a cold pack to keep them fresh during transit. They can then be reheated in an oven or microwave to bring back their delicious, cheesy goodness. Enjoy baking!
My to go to recipe for cheesy breadsticks; taste amazing!
Could I start this recipe in my bread machine on the dough cycle and finish them up in the oven?
Yes, you can definitely use your bread machine to start the dough for the cheesy breadsticks on the dough cycle. Just add the ingredients for the dough as directed by your bread machine’s manufacturer, typically starting with liquids, then adding dry ingredients, and finally the yeast. Once the dough cycle is complete, proceed with the recipe by shaping the dough, adding the toppings, and baking it in the oven as instructed.
I’ve made this recipe a few times now and it’s so good! Today I tried making a spicy version by adding pickled jalapenos and drizzling some buffalo sauce on top. I highly recommend it for those who like it spicy. Blue cheese dressing makes a great dipping sauce for this version.
Your recipe is amazing, thank you! I just had a quick question about how long to bake the cinnamon bread version. I was thinking 375 for 15-18 mins? If anyone has a different heating suggestion I’d love to hear. Thanks so much!
These are fantastic!! Although I bake a lot I’ve never made any sort of bread dough so I was a little bit apprehensive about trying these. There was no need to worry. This recipe is so simple to follow and the result is better than delivery. I will definitely be making these again. Thanks so much for the recipe!
Tweaks I made to this recipe; we save the garlic butter from our papa Johns and use it for grilled cheese. Was perfect for this! Also instead of mozzarella, try Monterey Jack cheese. Definitely tasted better with that. Also I did start it at 475°F and baked the dough for 5 minutes, then topped it with cheese. Turned the oven down to 400° and baked it for 10 minutes until the cheese started to slightly brown. It came out perfectly.
Cooking temperature is too high the cheese was burned, bland taste and not worth making for my personal opinion.
Response to Chona: It was your oven. Nothing wrong with this recipe. If you have a basic understanding of cooking, you can make this easily and it will be perfect, as mine was. The problem wasn’t with the recipe. It’s you. Or your oven.
Wow Michele. You are definitely better than the rest of us.
If you voted 1 star you somehow managed to fuck this up and shouldnt be cooking period. Maybe stick with microwaveable food.
Love breadsticks with gravy! I am stirring up some heaven on a plate right now.
Thank you for this recipe. This was a thousand times better than a store bought dough or takeout.
When I made the dough I was kind of worried because it didn’t seem like very much dough and didn’t rise much. When they went into the oven and come out they were delicious!! Next time I would probably double the recipe for the group I had, but if it was just my family (2-5 people) this is perfect!
I’m making now so I’m not sure how it will turn out, but a warning that when you adjust the portions using the 2x button, it does not adjust the amounts mentioned in the Instructions section. That’s pretty confusing for the water, and led me to use less water than what the amount should have been. Not sure if this happens in all recipes but I’ll look next time I do another one I’ve adjusted. If you’re using some kind of WP script to achieve the calculations, make sure it applies it to both sections! Thanks for your wonderful site, my daughter and I enjoy it very much.
Made these today. Didn’t have parm so I subbed in a cup of a half of mozz (do recommend using the exact amount of cheese, even if it does look like a lot). Added some oregano for a more of an Italian taste. I didn’t love the texture of the breadstick…. they were also too soft despite throwing them back in the oven? Can’t decide if it needs a bit more yeast or flour, but this recipe is a good starting point to tweak to your needs.
We made these twice now. The first time I made without Parmesan cheese and we preferred them that way unless you have fresh parm without the added anti caking agents. The second time we made them with Kraft Parmesan out of the green bottle and they were much drier. Have not been able to try with fresh parm yet. These are so good we’re making them for the third time tonight. They are like gourmet domino’s cheesy bread. Crave worthy. We use a bread maker to make our pizza dough. So easy. Set it and forget it!
WARNING!! If you make these you will want to make them all the time!! Way better than any cheesy breadstick I’ve gotten at a pizza chain. Delicious the next day too when the flavors have had more time to marinate. Made with bread flour and these actually could not be any better!
Followed to the tee added some oregano on top after it was baked.Dough is nice and soft. Will definitely try this again!
These were great and pretty simple to make. Thanks for sharing!
This is an outstanding recipe. I followed the instructions as-is and my bread came out impeccably soft and cheesy! This is the first recipe I’ve followed from your website and expect to make many more. Thank you!
This recipe is really easy to follow and gives great results! I was able to divide the dough a little and get a mini pizza along with 14 cheese sticks. Highly recommend! My family enjoyed these a lot!
I love this recipe and now I use this dough recipe for every flatbread I want to bake!!!!!!
Excellent recipe. Perfect for game day or a side to a soup. I added some Italian herbs to the dough for some extra flavor, and it turned put great. Will definitely make again.
thank you, I’ve used at least one of your recipes in the past and I remember it was good so I’m excited to try this one. one variation though: after baking, I will brush garlic butter over the cheese. this is how we finished off cheesy breadsticks where I used to work, even though you already put some on before baking. just makes them even better! this looks like what I’m going for. I’ll try to remember to rate once I try it. thanks
Finally made these to go with soup on a rare cold and windy day in AZ. They were delicious! Too small of a dough ball for my Bosch though… I’ll hand mix next time, or double the batch! I liked one of the prior comments in which someone said they would try cooking in the cast iron skillet. That sounds yummy.
So good and really pleased with the recipe!
This was very simple and SO delicious!
Love your recipes…….didn’t change a thing and they were perfect. Thank you for all your great recipes.
Question: I don’t have a pizza stone so I will be using a cookie sheet. Why does it have to go in the oven upside down? Thanks!
That’s how I do it so it acts like a “baking stone”. You don’t have to flip it over. Or use a baking tray with no sides instead.
Hi Lauren.
I just have a question about putting this bread onto the pizza stone.
I know I have to pre bake the oven with the pizza stone in the oven.
If I roll the dough out on the baking paper, do I put the baking paper with dough on top straight onto the stone?
I just don’t want to cause a fire in my oven.
I’m just not sure which way to do this.
It this also the same way with making your pizzas?
Thank you and kind regards
Julie
Hi Julia. Yes, just roll the dough out on parchment paper and then lift it and set it (still on the parchment) onto the baking stone in the oven.
Thank you so much for your quick response.
I will let you know how it turns out.
Julie
Really enjoyed this! Made it to have with tomato basil soup and it worked great. Only the second time I’ve ever made any dough lol.
I’m really happy you liked it! Thanks Bailey!
Really good recipe. Easy to make, chewy and cheesy breadsticks. My little family loved them! Will be saving this for later. Thanks!
I tried these today. Great tip about how sticky the dough should be. It really helped decide whether or not I needed to add more flour. I added the tiniest pinch of red chile flakes and a large pinch of Italian Seasoning to the butter. Next time going to bump up the garlic a bit. Will definitely make these again. However, would like them to brown better on the bottom. Will try baking in my cast iron skillet. Any other ideas?
Just made these for the kiddos for pizza night and they are amazing! I added a little Italian seasoning to the garlic butter. What a treat! Thanks for sharing this wonderful recipe!
Thank you so much Kimberly! That really makes me so happy that your family loved it.
So yummy! In Canada we call these “garlic fingers”, and only on the East Coast (New Brunswick, Nova Scotia, PEI, Newfoundland).
We dip them in “Donair Sauce”, which is this sweet sauce made from vinegar, garlic, evaporated milk & sugar). Sounds odd, but its one of those things that is a staple when ordering pizza. So happy I found this recipe, thank you!
Thanks for sharing! That sauce sounds delicious!
Wow! That’s the best appetizer ever! Always love cheese & garlic combination! Thank you for sharing!
My pizza is in the oven right now – just a few hours after I found your wonderful recipe!!
Well – we actually get two recipes in one. A great appetizer recipe AND a great pizza dough recipe. I’ve never seen a pizza dough recipe that includes a bit of vinegar. I’m gonna try that… actually…. right now! PINNING this – as always!
Couldn’t believe you were posting this so soon to leaving for the hospital to welcome baby no. three!! Wishing you all the very best!